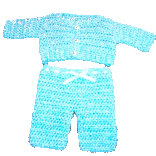
Little Boy Blue – Long Pant Suit
 Fits approximately 1-3 lbs.
© Created by June Herd
Materials:
Red Heart – TLC Baby Ultra Soft (approximately 2 1/2 oz)
Crochet hook "F"
Three Buttons (Shirt)
Small Amount of Ribbon (Pants)...
PANTS:
Starting at waist chain 54 loosely; join to form circle being careful not to twist.
Row 1: HDC in each stitch; join with sl st in first hdc. (54 hdc)
Row 2 - 10: Ch 1 turn; hdc in each stitch; join with sl st in first hdc (54 hdc). DO NOT CUT THREAD.
Legs:
Row 1: Ch 1 turn; hdc in same next 27 stitches of row 10 below; skip next 27 stitches and join in 1st hdc with sl st.
Row 2 – 12: Ch 1 turn; hdc in next 27 st; join with sl st in 1st hdc.
At end of row 12, cut yarn and secure.
Working in remaining 27 stitches of row 10 of pants; repeat legs instruction for second leg.
Waistband:
Sc in each stitch on beginning chain. (54 sc.)
Ribbon: Thread ribbon through round 1 of pants. I usually thread behind two stitches, in front of two stitches, behind, etc. then tie with a small bow in front. Be sure your joining stitches are in the BACK.
Crotch: You will need to stitch the crotch together with one or two stitches – I use a darning needle with yarn.
TOP:
Ribbing (bottom of shirt):
Row 1: Ch 6 – sc in second ch from hook and in next 4 ch. (5 sc)
Row 2 – 56: Ch 1 turn; sc in each stitch working in back loops only. (5 sc each row).
At end of row 56; ch 1 turn and start working down long edge of ribbing as follows:
Row 1: 1 hdc in end of each row. (56 hdc)
Row 2 – 6: ch 1, turn; hdc in each stitch across (56 hdc)
Left front:
Row 7: Ch 1 turn; work 1 hdc in next 11 stitches. (Leave remaining stitches in this row unworked for now)
Row 8 – 9: Ch 1 turn; work 1 hdc in next 11 stitches.
Row 10: Ch 1 turn; work 1 hdc in first 5 stitches (leave remaining unworked for neck edge)
Row 11: Ch 1 turn; work 1 hdc in each stitch (5 hdc).
Row 12: Ch 1 turn; work 1 hdc in each stitch (5 hdc). End off – cut thread and secure.
Back:
Working on remaining unworked stitches of shirt row 6 as follows:
Row 7: Skip 6 stitches and attach yarn in 7th stitch. Ch 1 work 1 hdc in 22 stitches (22 hdc).
Row 8-11: Ch 1 turn; work 1 hdc in each stitch (22 hdc).
Row 12: Ch 1 turn; work 1 hdc in first 5 stitches. Cut and secure thread. Skip next 12 stitches and reattach yarn – work 1 hdc in last 5 stitches on row. Cut and secure thread.
Right front:
Working in remaining unworked stitches on shirt row 6 as follows:
Row 7: Skip 6 stitches and attach yarn in 7th stitch. Ch 1 work 1 hdc in 11 stitches (11 hdc).
Row 8 – 9: Ch 1 turn; work 1 hdc in next 11 stitches. Cut and secure thread.
Row 10: Turn work and skip first 6 stitches to form neck edge; attach thread in 7th stitch. Ch 1 work 1 hdc in last 5 stitches on row.
Row 11: Ch 1 turn; work 1 hdc in each stitch (5 hdc).
Row 12: Ch 1 turn; work 1 hdc in each stitch (5 hdc) – cut thread and secure at end of row.
With wrong sides facing sew shoulder seams.
Each Sleeve:
Row 1: With wrong side facing attach yarn in any skipped stitch under arm. Working in skipped armhole stitches and in end rows of armholes on shirt, work 1 hdc in each stitch around. Join with sl st in first hdc. (19 hdc).
Row 2 – 13: Ch 1 turn; work 1 hdc in each stitch (19 hdc).
Ending wrong side of sleeve toward you , cut thread and secure.
Turn shirt right side out.
Facing:
Row 1: Attach yarn at bottom left front. Work 1 sc in each stitch up left front, across neck opening and down right front. Be sure to put 3 sc at top of each front side.
Row 2: Ch 1 turn. Work sc in each stitch around – on left front, evenly space 3 buttonholes. To make a button hole, sc in stitch – ch 1 and skip 1 sc below; sc in next sc.
Sew on three buttons on right front edging. Wrap and send set to GTA!
Author: © June Herd
Written with permission
Please do not post these free patterns on your web
site, they are copyright
protected.